Wednesday, February 4, 2015

DIY: Stimulating treatment for hair growth and scalp health!

I'm FINALLY back with a new DIY!!!

I've been playing around a lot lately, having a ball but have had zero time to put them into the form of a blog. Frustrating some days considering I have been bursting at the seems with new tips and tricks.

If you follow me you know I have 2 babies under 2.
Yes. I'm crazy. 
But I LOVE it!

I'm 5 mos PP from having my daughter and have been dealing with loads and loads of PP hair loss.
I've felt half insane and not just me but my husband as well; just this morning he complained about having stray hairs clinging to his face as he woke up. Funny but kinda nasty.
OR we will be cleaning up a mess on the floor from the kiddos and we find my hair stuck to everything and I mean EVERYTHING! I'm feeling pretty gross most days right now-like I've plagued our entire house with shedding hair.

This is from me combing out my hair before I did this DIY...
This is a small clump!

 Again, not the biggest I've pulled after washing my hair...

With my hormones reacting very differently after this baby and my hair doing what it's doing as well as my scalp. Oh yes, my scalp has joined in on the fun too. My poor scalp is so dry, itchy and flakey these days I've wanted to rip my hair out. (Not that I'm not losing enough already...) I've tried several crunchy and non crunchy methods for this and I'm only just starting to see a change and this hair/scalp treatment is one way I'm helping my poor head.

Let's delve into this quick and easy DIY shall we?


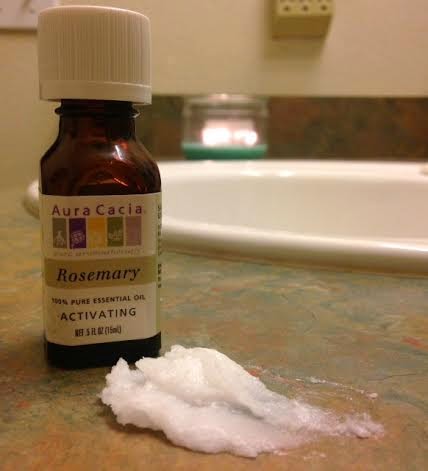
What you'll need and why:

A. Cold pressed, Organic coconut oil

1. Because it's considered a "dry" oil and won't make you feel like a grease-ball if you choose to do the 24-48 hour version of this.

2. Coconut oil has antibacterial properties as well as deep hydration benefits.

3. Naturally soothes itching and inflammation.

4. Helps with healthy hair growth.

B. Rosemary Essential Oil

1. A stimulating EO for hair growth by triggering a more active state for the follicle.

2. There's rumor it can slow the graying process.

3. Is a good oil for men or women suffering with hair loss other than those with PP hormones trying to regulate.

4. Is a booster for decreasing dryness and acne if you breakout around the scalp area. 
The antimicrobial properties are a major plus here!

** This oil should never be used on pregnant and nursing mommies!!
(I am no longer able to breastfeed thus why I'm able to do this. I would be if I could though!)

I suggest dividing your head in 2 sections...

Top half and bottom half or Left side and Right side.

You'll need to base the amount of coconut oil off thickness and length of your hair.
So between a Penny to Quarter sized or Silver dollar if you have crazy thick or super long hair.

Per Section... 

You'll want 3 drops of Rosemary EO.
Your scalp should feel cool and tingly, no burning!
Should a burning sensation happen I suggest washing your hair asap as you might have a higher sensitivity to this particular EO. If desired, try again but use 1-2 drops per section.

Massage your scalp and drag oil to the ends of your hair.

Let it set for 30 min to an hour or use as an overnight treatment!
Heck, you can be bold and go for 24-48 hours like I have.
(I've even gone to work like this, just pinned my hair up and put on some extra fun earrings to distract from my less than fancy hairdo.) **If I'm leaving this in while I sleep I put a towel on my pillow.

I'm doing this treatment as we speak and will probably be shooting for a 48 hour go with this seeing as I want extra clean hair for a baby shower I'm attending this weekend for a fellow blogger and soon-to-be mommy Melissa @ Freeing Imperfections!! 
You can see her blog here... http://freeingimperfections.com/ 

Have a wonderful day and God Bless,
Shannon <3

Thursday, May 1, 2014

Wedding Prep! Pt 1. DoTERRA

It's heading towards one of the biggest wedding season... SPRING/SUMMER!!

 I usually like to touch on this topic each year and decided a mini blog series would be a nice touch for 2014. I have picked some companies that I know have great products as well as some DIY home goodies to help you out. In general you should be caring for you skin on a daily basis by doing things from the inside out but there's a time in a woman's life where she likes a little extra TLC for her body/skin and her wedding is most likely the biggest! (Who can blame her?? All those photos, man of her dreams etc...) 

Let's do this!

The list of companies (but not limited to) are:

DoTERRA Eseential Oils

Michael Todd True Organics

Yonka Paris

Juice Beauty

Nutivia

Etc...

But for today's blog we're covering DoTERRA!

Essentail oils are a wonderful way to support your body's health from the inside out. 

They help build or rebuild your immune system, can be used for detox, can relax your mind and body or give you that energizing boost one might need! (Plus SO much more!) I'm delving into this world more and more since I had my son and am now pregnant with #2 and getting the news of my mom's breast cancer a month or so back. I get more excited with each new gem I uncover and wish more people knew about these precious gifts of nature. Seriously, Google away or talk to a nutritionalist who's certified and you'll be opened to a whole new world of possibilities for living...

As for prepping for that big day there are a few things you can do that are simple and don't take much time so you don't need to feel overwhelmed. In fact this may help that feeling during wedding planning. Remember, if you overly stress while planning all the way up to the very day of your wedding it will show on your skin! Seen it many times.

Ashley's Green Life on youtube (or her blog) talk about various ways to use them internally or for defusing purposes. I suggest checking her out and here's a link for a "Flu Bomb" to help ward off sickness: http://www.ashleysgreenlife.com/2014_03_01_archive.htm

I really think having a small arsenal on hand is a good thing!
For wedding prep there are a few I'd really suggest...


Oils to consider:

Lavender
(Amazing for acne, relaxation, sleep aid etc...)

Ylang Ylang
(Relaxation, good for sensitive skin types, sedative/antidepressant)

Peppermint
(Stomach soother, awakens the mind for focus, great in water, headache aid)

Wild Orange
(Energizing, great in water, warm face compress with towel for mental clarity)

Melaleuca
(Tea tree oil basically, acne aid, water aid for washing skin if feeling "bumpy")

Slim n Sassy
(This is a special extra to consider)
http://www.doterra.com/tools/documents/PIPSlimSassy.pdf 
(For that extra boost in your physical workout/diet prep!)

Sandalwood
(Sleep aid, Anti anxiety, Anti-inflammatory)

** As ALWAYS, dilute and make sure any oil doesn't have an interaction with any med or health condition! Also double check on side effects if you tend to have a very "reactive" body.   **

Now this may seem like a massive list to some so I'll just name the "must haves" if you're sitting there face-palming yourself ;)

Must Haves:

Lavender or Melaleuca
(For acne)

Wild Orange and Peppermint
(For water enhancement)

Sandalwood
(For sleep)

Acne care:

1. Drop 2-3 drops in a sink full of warm water and use that to cleanse your face at night.
(Just watch opening your eyes)

2. Any facial oil you may be using at night can have either Lavender or Melaleuca added 1 drop for night treatments. (Avoid contact with eyes)

3. Wet a cotton ball tip and add a drop of oil and use on any nasty blemish popping up on your skin. Morning, noon and night if desired.

Water aid:

Hydration/energy boost using Wild Orange and Peppermint using a pitcher to a gallon sized jar and adding several drops of each. Basically the water should have a cooling effect and slightly taste of orange... Roughly 5-10 drops depending on the amount of water being used, you decide what balance tastes best for you as everybody is different. Some people use more but I run on the side of slightly less. Google around if curious...This has given me wonderful energy when I've had a full day at work and needed to stay on track. 

Sleep: 
(Sandalwood, Lavender, Ylang Ylang

1. Make a pillow spray in 4 oz dark glass spray bottle using 4-6 drops.
https://www.mountainroseherbs.com/catalog/glass-bottles 

2. Use in oil burner next to bed 1 hour before crashing. 

3. May be used with a carrier oil to rub on chest and back of neck, 1-2 drops. 

4. Add to a bath with epsom salts and baking soda for a detox soak. 
(Be in for at least 20-30 min) 

5. Put a few drops into a burning vanilla candle. 

 There are many other methods in using you EO's and it's a good idea to read up on them.
You can even call around to spa's and see if they offer pure EO (Essential Oil) based facials. I know DoTERRA has their own facial/spa system and I wish I was able to use their system at work! As in I wish we carried their facial products vs just their oils for our treatment rooms. I'm always including oils in my treatments and the last time I actually made myself hungry with the Wild Orange.

See you in the next blog, we will be going over the company Michael Todd True Organics! 

Shannon <3


Saturday, October 19, 2013

DIY Night Treatment For Skin Take 2!!

Greetings!!

I decided to try another rout with my night treatment because I know not everybody can use coconut oil as their base. The next best oil is Extra Virgin, Cold Pressed, Olive Oil!

Here are some facts about our friend:

1. Linoleic acid (Not made by the skin) is a powerful property for helping prevent hydration loss.
(Easily penetrates the skin and helps heal or speed up healing time and amazing for those who feel like they live in the land of dehydrated skin!)

2. Anti cancer.

3. Fights those pesky free rads and fights cell destruction. 

4. Yet again a glorious anti age knight in shining armor. 

5. Improve texture, those useless little bumps that aren't acne based.

Sounds good huh? 
I'm equally in love with this rout as well!! 

Here's what I do:


A. I use a dark glass jar with a dropper top, about 5 oz in size.
(Blue or brown preferably)

B. Fill jar with my oil just before I hit that little "neck" so I don't have overflow issues when the dropper is placed inside.

C. I first add 1-2 drops of lavender essential oil in my hand 
(Why I use this particular oil...http://shannonaestydiygoodies.blogspot.com/2013/09/diy-night-acne-fightinghydrating.html ) then use a less than dime sized amount of the olive oil to mix with it. (If you need a dime sized amount that's totally fine!) 

D. Apply to face, neck and chest using upward and outward motions and let your skin drink till it's content!

**If you love another oil for your skin try this method out and see what you think. 
i.e. Jojoba as it mimics the functionality of our skin's natural oil production. :) 

**If you desire to mix both coconut and olive oil you can do that as well. 
Just warm the oil to so the coconut oil melts and you have a proper blend when using!  

I love feedback so hit me up and don't forget to come see me on facebook and click "like" for more tips!


Shannon <3 


Thursday, September 12, 2013

DIY Night (Acne Fighting/Hydrating) Treatment!

I've been doing lots of research on the true value of coconut oil and am pleased to say I'm addicted to this amazing substance! I know there are claims it's unhealthy and blah, blah blah..... Now if it's about allergies that's a totally different topic and it's a case where I obviously wouldn't recommend using it!

My skin started to do a lot of changing when I got pregnant and after I had my son.
I needed an intensive night treatment that wasn't going to break the bank, leave me feeling gross come morning or break me out. I wanted something to chill my hormonal breakouts and hydrate my skin!

I was frustrated to say the least.

I know this isn't a universal oil that everybody can use on their face and it's usually high acne prone (cystic) or intensely oily skin types. Other than that I've learned it's trial and error or if you have other skin conditions that don't like particular oils. If you have combo, dry or sensitive skin this may work for you. I've been doing it for nearly 2 months now and am ridiculously pleased!!

Would you believe I'm only using 2 ingredients?
AND
I'm spending hardly anything!

My total cost to get setup was $28.68
That was buying a 54 fl oz jar of coconut oil, 0.5 oz bottle of lavender essential oil via vitacost.com


Lavender is a wonderful anti inflammatory and anti bacterial essential oil.
Coconut oil is a glorious lash conditioner/growth stimulant, helps preserve skin's elasticity longer, it's anti viral, anti bacterial etc. 

Here's how I did it: 

1. Get a small jar new or recycle one. 
(I used a 2fl oz jar I recycled from another cream I used to buy)

2. Melt your coconut oil via a double boiler, melt it in a small pot or microwave it in a glass bowl.
Pour into jar once fully melted and grab your essential oil...

3. Add 5-12 drops of lavender essential oil. 
(The more acne fighting power you desire the higher the level of drops you use.)

4. Place in the fridge to cool or leave set out if it's not a hot day let it set out to solidify.

How I use it nightly:

I simply cleanse and tone my face as normal then apply a less than dime sized amount of this treatment on my face, neck, eyes and lashes!

** Yes, you will feel slick when going to bed but you will wake up hydrated and plump. I'm in love! 
My acne has calmed and if I get some blemishes that try to show their face during the day and I use this at night their yucky little lives are cut short. This is my nightly treatment now and I don't see me changing it any time soon. Try it!!

Shannon <3 


Monday, August 5, 2013

DIY Green tea detox water!

I've been watching people use green tea as a scrub for their face a while on youtube and Bubz is the one that got me thinking... I LOVE to drink green tea and seriously miss it! (Can't consume it when you're pregnant or nursing.) It was a great way to add a natural spring to my step and help me feel healthy as it's a wonderful antioxidant. 


Here's the idea I came up with:

Use green tea as a scrub but also use the tea made from the teabag so you don't waste it!
(You need to soak the leaves to activate the goodness inside)

You're still benefitting, just in a different way :)


A. Turn your faucet on hot and let the tea steep for 5 min.. 
You have now created a nice detox water to aid in cleansing your face.
(Can you see my burnt out bulb in the reflection of the water? haha)

B. Use this to dampen your face and then pump out your cleanser mixing with it in your hands or a bowl with the tea leaves from your teabag. Scrub, gently in circular motions for a min or so. (I used my Cleanse And Tone from Michael Todd. My new favorite!)

C. Rinse face and pat dry or move onto a mask if desired

The end result looked pretty gross but it felt SO good :)
My skin was so clean and crisp, I will be dong this again!


** If you're planning on a mask make sure you use clean water for rinsing. 

I hope you enjoy this quick skin gem like I did!
Such a fast way to have a green tea detox using your water you cleanse with at night.
I wouldn't use the scrub more than 2-3 times within a week. Or save it for your once a week mini facial treatment like me.

Shannon <3


Tuesday, June 25, 2013

Inspired: DIY Peanut Butter Breakfast Shake!

Good Morning All!

I have a breakfast shake I wanted to post about that's super easy and fast!
I was inspired by my friend Melissa who owns the blog "Freeing Imperfections"

Here's her version: 


I was oddly craving peanut butter this morning so I thought I'd try my own version and see how it turned out. I figured I had enough ingredients so why not give it a whirl! 

Here's my particular version and what you'll need:


1. You'll need 1 cup of any milk of your choice
(I use vanilla coconut or vanilla almond since my son can't digest cow's milk)

2. 1/2 cup rolled oats
(Let soak in milk for 10 min or so)

3. A big dollop of vanilla yogurt
(Optional)


4. Take any desired amount of each ingredient above and put in a small glass bowl.
(Don't go crazy on the coconut oil ;)

5. Microwave until melted into creamy goodness!


6. Add this mixture to your yogurt, milk and oats 

7. If desired add a half to full scoop of whey, vanilla (or chocolate) protein powder and blend until smooth!

It should look frothy and creamy like this:
(Please ignore the nails! I am trying to get in for a mani asap! ;)

It's thickish but a hearty shake to be sure.

**Anything with oatmeal should never be drank at a snails pace. Trust me on this.

Shakes really help for busy mommies or for anybody who's in a rush but still wants some nutrition feeding their body. A wonder for blood sugar levels too!

Give this a try and enjoy :)

Shannon <3

Come check out my fb page!


Saturday, February 16, 2013

DIY Easy Organic Cold Kicker!

A dear family friend txt me this info the other day and I decided I'd give it a shot seeing as I've been struck with a cold and would like to be better since the baby is due ANY day now!

Besides, who wants to feel crappy anyway?

Hmmm Nobody!

Here's how you mix it:

1. Half a mug of filtered water heated for 2 min

2. Roughly an oz or so of Bragg apple cider vinegar mixed in

3. Healthy spoon full of organic, raw honey

4. Lemon slice

5. Let it cool to taste then drink!


Sure it's kinda of strong in smell and maybe taste for some but I don't mind it.

**Just make sure you have something in your tummy BEFORE you drink this and DON'T brush your teeth for at least 30 min after. Try to have it twice in one day if you can.

The honey is a huge flavor helper so if you need more just add it! Raw honey is awesome for you so you're not going to hurt the mixture by any means. It's jam packed with B6, thiamin, niacin and riboflavin. (Of course volume of each nutritional aspect depends on the flower it's derived from.)
It's also a fantastic antioxidant!

I was also told it's great to use as a cold deterrent if you feel something coming on.

Have a wonderful day,
Shannon <3